3. My first GBA demo
- Finally, your first GBA program
- Your second first GBA program
- General notes on GBA programming
- Testing your code on a real GBA
Finally, your first GBA program
Now that you have your development environment ready, it’s time to take a look at a simple GBA program. For this we will use the code from the C-file first.c. The plan at this point is not full understanding; the plan is to get something to compile and get something running. The code will be discussed in this chapter, but what it all means will be covered in later chapters.
// First demo. You are not expected to understand it
// (don't spend too much time trying and read on).
// But if you do understand (as a newbie): wow!

int main()
{
    *(unsigned int*)0x04000000 = 0x0403;

    ((unsigned short*)0x06000000)[120+80*240] = 0x001F;
    ((unsigned short*)0x06000000)[136+80*240] = 0x03E0;
    ((unsigned short*)0x06000000)[120+96*240] = 0x7C00;

    while(1);

    return 0;
}
Don’t worry about the code just yet, there’s time for that later. And don’t leave yet, I’ll give a nicer version later on. All that matters for now is that you’re able to compile and run it.
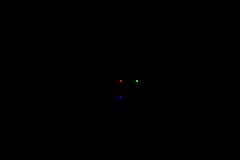
Fig 3.1: picture of the first demo
As explained in the previous chapter, you can run make in your terminal to build the project. Under the hood this does the following:
- compile first.c to first.o,
- link the list of object files (currently only first.o) to first.elf,
- translate first.elf to first.gba by stripping all excess ELF information,
- fix the header so that the GBA will accept it.
After the makefile has run, you should have a file called first.gba. If you don’t, there’s a problem with your setup because the code sure isn’t wrong! Go back to make sure you didn’t miss anything - but if you’re still having trouble, feel free to stop by on Discord / IRC or the Forums, there’s a good chance someone will be able to help!
If you do find yourself with a GBA executable, run it on hardware or your emulator of choice and you should get a red, a green, and a blue pixel at positions (120, 80), (136, 80) and (120, 96), respectively.
Now, for the code itself…
Huh?
If you’re somewhat confused by it, you wouldn’t be alone. I expect that unless you already know a thing or two about GBA programming or have experience with low-level programming from other platforms, the code will be a total mystery. If you’re proficient enough in C you may have some idea what’s making the three pixels appear, but I admit that it is very hard to see.
And that was kind of my point actually. If one were to hand this in for a test at a programming class, you would fail so hard. And if not, the professors should be fired. While the code show above does work, the fact that it’s almost unreadable makes it bad code. Writing good code is not only about getting results, it’s also about making sure other people can understand what’s happening without too much trouble.
The code of first.c also serves another purpose, namely as a reminder that GBA programming is very low-level. You interact directly with the memory, and not through multiple layers of abstraction brought by APIs. To be able to do that means you have to really understand how computers work, which all programmers should know at least to some degree. There are APIs (for lack of a better word) like HAM that take care of the lowest levels, which definitely has its merits as it allows you to deal with more important stuff like actual game programming, but on the other hand it hides a lot of details – details that sometimes are better left in the open.
Those who want a better, more intelligible, version of the previous code can skip the next section and move on to the second first demo. The warped minds who can’t just let it go and want to have an explanation right now (for the record, I count myself among them), here’s what’s going on.
Explanation of the code
This is a quick and dirty explanation of the earlier code. Those previously mentioned warped minds for whom this section is intended will probably prefer it that way. A more detailed discussion will be given later.
As I said, GBA programming is low-level programming and sometimes goes right down to the bit. The 0x04000000 and 0x06000000 are parts of the accessible memory sections. These numbers themselves don’t mean much, by the way; they just refer to different sections. There aren’t really 0x02000000 between these two sections. As you can see in the memory map, these two sections are for the IO registers and VRAM, respectively.
To work with these sections in C, we have to make pointers out of them, which is what the ‘unsigned int*’ and ‘unsigned short*’ do. The types used here are almost arbitrary; almost, because some of them are more convenient than others. For example, the GBA has a number of different video modes, and in modes 3 and 5 VRAM is used to store 16-bit colors, so in that case casting it to halfword pointers is a good idea. Again, it is not required to do so, and in some cases different people will use different types of pointers. If you’re using someone else’s code, be sure to note the datatypes of the pointers used, not just the names.
The word at 0400:0000 contains the main bits for the display control. By writing 0x0403 into it, we tell the GBA to use video mode 3 and activate background 2. What this actually means will be explained in the video and bitmap mode chapters.
In mode 3, VRAM is a 16-bit bitmap; when we make a halfword pointer for it, each entry is a pixel. This bitmap itself is the same size as the screen (240x160) and because of the way bitmaps and C matrices work, by using something of the form ‘array[y*width + x]’ are the contents of coordinates (x, y) on screen. That gives us our 3 pixel locations. We fill these with three 16-bit numbers that happen to be full red, green and blue in 5.5.5 BGR format. Or is that RGB, I always forget. In any case, that’s what makes the pixels appear. After that there is one more important line, which is the infinite loop. Normally, infinite loops are things to be avoided, but in this case what happens after main() returns is rather undefined because there’s little to return to, so it’s best to avoid that possibility.
And that’s about it. While the Spartan purity of the code does appeal to a part of me, I will stress again that this is not the right way to program in C. Save the raw numbers for assembly please.
Your second first GBA program
So, let’s start over again and do it right this time. Or at least more right than before. There are a number of simple ways to improve the legibility of the code. Here is the list of things we’ll do.
- First and foremost is the use of named literals, that is to say #defined names for the constants. The numbers that went into the display control will get proper names, as will the colors that we plotted.
- We’ll also use #define for the memory mapping: the display control and VRAM will then work more like normal variables.
- We’ll also create some typedefs, both for ease of use and to indicate conceptual types. For instance, a 16-bit color is essentially a halfword like any other, but if you typedef it as, say,
COLOR, everyone will know that it’s not a normal halfword, but has something to do with colors. - Finally, instead of plotting pixels with an array access, which could still mean anything, we’ll use a subroutine for it instead.
Naturally, this will expand the total lines of code a bit. Quite a bit, in fact. But it is well worth it. The code is actually a two-parter. The actual code, the thing that has all the functionality of the first demo, can be found in second.c. All the items discussed above, the typedefs, #defines and inlines, are put in toolbox.h.
// toolbox.h:
//
// === NOTES ===
// * This is a _small_ set of typedefs, #defines and inlines that can
//   be found in libtonc, and might not represent the
//   final forms.


#ifndef TOOLBOX_H
#define TOOLBOX_H

// === (from tonc_types.h) ============================================

typedef unsigned char   u8;
typedef unsigned short  u16;
typedef unsigned int    u32;

typedef u16 COLOR;

#define INLINE static inline

// === (from tonc_memmap.h) ===========================================

#define MEM_IO      0x04000000
#define MEM_VRAM    0x06000000

#define REG_DISPCNT     *((volatile u32*)(MEM_IO+0x0000))

// === (from tonc_memdef.h) ===========================================

// --- REG_DISPCNT defines ---
#define DCNT_MODE0     0x0000
#define DCNT_MODE1      0x0001
#define DCNT_MODE2      0x0002
#define DCNT_MODE3      0x0003
#define DCNT_MODE4      0x0004
#define DCNT_MODE5      0x0005
// layers
#define DCNT_BG0        0x0100
#define DCNT_BG1        0x0200
#define DCNT_BG2        0x0400
#define DCNT_BG3        0x0800
#define DCNT_OBJ        0x1000


// === (from tonc_video.h) ============================================

#define SCREEN_WIDTH   240
#define SCREEN_HEIGHT  160

#define vid_mem     ((u16*)MEM_VRAM)

INLINE void m3_plot(int x, int y, COLOR clr)
{   vid_mem[y*SCREEN_WIDTH+x]= clr;    }

#define CLR_BLACK   0x0000
#define CLR_RED     0x001F
#define CLR_LIME    0x03E0
#define CLR_YELLOW  0x03FF
#define CLR_BLUE    0x7C00
#define CLR_MAG     0x7C1F
#define CLR_CYAN    0x7FE0
#define CLR_WHITE   0x7FFF


INLINE COLOR RGB15(u32 red, u32 green, u32 blue)
{   return red | (green<<5) | (blue<<10);   }

#endif // TOOLBOX_H
#include "toolbox.h"

int main()
{
    REG_DISPCNT= DCNT_MODE3 | DCNT_BG2;

    m3_plot( 120, 80, RGB15(31, 0, 0) );    // or CLR_RED
    m3_plot( 136, 80, RGB15( 0,31, 0) );    // or CLR_LIME
    m3_plot( 120, 96, RGB15( 0, 0,31) );    // or CLR_BLUE

    while(1);

    return 0;
}
As you can see, the number of lines in toolbox.h is actually much larger than that of the real code. This may seem like a bit of a waste now, but this is only because it’s such a small demo. None of the contents of toolbox.h is actually compiled, so there is no cost in terms of memory use. In fact, if it did it wouldn’t belong in a header file, but that’s a discussion I’ll go into another time. Right now, let’s see what we actually have in toolbox.h
The toolbox
Types and typedefs
First of all, we create some shorthand notations of commonly used types. No matter what anyone says, brevity is a virtue. For example, unsigned types are very common and writing out the full names (e.g, ‘unsigned short’) serves little purpose. The shorthand ‘u16’ is just much more convenient. Besides convenience, it also gives better information on the size of the variable, which is also of great importance here.
I’ve also added a conceptual typedef. While it’s true that, in principle, an int is an int no matter what it’s used for, it is helpful if you can tell what its supposed use is from its type. In this case, I have a COLOR alias for u16 when I want to indicate a particular halfword contains color information.
Memory map defines
To be able to work directly specific addresses in memory, you’ll have to cast them to pointers or arrays and work with those. In this demo’s case, the addresses we’re interested in are 0600:0000 (VRAM) and 0400:0000 (the display control register). In the first demo I did the casts manually, but it’s better to use names for them so that you don’t have to remember all the numbers and also because nobody else would have any clue to what’s going on.
For the IO registers I’m using the official names, which are recognized by all parties. The display control is known as REG_DISPCNT, and is defined as the word at 0400:0000. Note that neither the name nor the type are set in stone: you could as easily have called it “BOO” and even used a halfword pointer. The full list of register #defines can be found in libtonc’s tonc_memmap.h.
For those who aren’t as familiar with pointers as you should (boy, are you gonna be in trouble :P), here is the structure of the REG_DISPCNT #define. I’m using vu32 as a typedef for ‘volatile u32’ here.
#define REG_DISPCNT *((volatile u32*)(MEM_IO+0x0000))
| code | type | description |
|---|---|---|
MEM_IO+0x0000
| Address | MEM_IO=0x04000000, so this is address 0400:0000
|
(vu32*)0x04000000
| pointer | A pointer to an unsigned int of the volatile persuasion (ignore this last part for now) |
*(vu32*)0x04000000
| ‘variable’ | By dereferencing the pointer (the ‘*’ unary operator), we access the contents of the pointer. Id est, the whole thing becomes usable as a variable. |
So for all intents and purposes, REG_DISPCNT is a variable just like any other. You can assign values to it, read its contents, perform bit operations on it and so forth. Which is good, because that’s just the way we want to use that register.
A similar procedure is carried out for VRAM, only this is still in its pointer form in the end. Because of that, vid_mem works as an array, not a variable. Again, this is exactly how we want things. Please be careful with the definition, though: all the parentheses there are required! Because of the operator precedence between casts and arrays, leaving out the outer parentheses pair gives compilation errors.
IO register and their bits
The IO registers (not to be confused with the CPU registers) are a collection of switches in the form of bitfields that control various operations of the GBA. The IO registers can be found in the 0400:0000 range of memory, and are usually clumped into words or halfwords according to personal preference. To get anything done, you have to set specific bits of the IO registers. While you can try to remember all the numerical values of these bits, it’s more convenient to use #defines instead.
The toolbox header lists a number of the #defines I use for REG_DISPCNT. The full list can be found in tonc_memdef.h of libtonc, and the register itself is described in the video chapter. For now, we only need DCNT_MODE3 and DCNT_BG2. The former sets the video mode to mode 3, which is simplest of the 3 available bitmap modes, and the latter activates background 2. Out of a total of four, bg 2 is the only one available in the bitmap modes and you have to switch it on if you want anything to show up. You have to admit that these names are a lot more descriptive than 0x0003 and 0x0400, right?
I’ve also added a list of useful color defines, even though I’m not using them in second.c. They may or may not be useful in the future, though, so it’s good to have them around.
Creating the register #defines is probably the biggest part of header files. As a rough estimate, there are 100 registers with 16 bits each, so that would be 1600 #defines. That’s a lot. The exact number may be smaller, but it is still large. Because the names of the #defines in and of themselves aren’t important, you can expect different naming schemes for different people. I am partial to my own set of names, other older GBA coders may use PERN’s names and more recent ones may use libgba’s, which comes with devkitARM. Take your pick.
Macros and inline functions
You can also create #defines that work a little like functions. These are called macros. I’m not using them here, but there are plenty to be found in libtonc’s headers. Like all #defines, macros are part of the preprocessor, not the compiler, which means that the debugger never sees them and they can have many hidden errors in them. For that reason, they have been depreciated in favor of inline functions. They have all the benefits of macros (i.e., integrated into the functions that call them so that they’re fast), but are still function-like in syntax and resolved at compile time. At least that’s the theory, in practice they’re not quite as speedy as macros, but often preferable anyway.
One inline function I’m using is m3_plot(), which, as you may have guessed, is used to plot pixels in mode 3. In mode 3, VRAM is just a matrix of 16bit colors, so all we have to do to plot a pixel is enter a halfword in the right array element. m3_plot() looks exactly like a normal function, but because the ‘static inline’ in front of it makes it an inline function. Note that inlining is only a recommendation to the compiler, not a commandment, and it only works if optimizations are switched on.
// Mode 3 plotter as macro ...
#define M3_PLOT(x, y, clr)   vid_mem[(y)*SCREEN_WIDTH+(x)]=(clr)

// and as an inline function
static inline void m3_plot(int x, int y, COLOR clr)
{   vid_mem[y*SCREEN_WIDTH+x]= clr;  }
The second inline function is RGB15(), which creates a 16bit color from any given red, green and blue values. The GBA uses 16bit colors for its graphics – or actually 15bit colors in a 5.5.5 BGR format. That’s 32 shades of red in the first (lowest) 5 bits, 32 greens in bits 5 to 9, and 32 blues in 10-14. The RGB15() inline takes care of all the shifting and masking to make that happen.
The working code
Making use of the contents of toolbox.h makes the code of the demo much more understandable.
The first line in main() sets a few bits in the display control, commonly known as REG_DISPCNT. I use DCNT_MODE3 to set the video mode to mode 3, and activate background 2 with DCNT_BG2. This translates to 0x0403 as before, but this method gives a better indication of what’s happening than entering the raw number. Using a variable-like #define instead of the raw dereferenced pointer is also preferable; especially as the latter is sure to wig out people new to C.
So how do I know what bit does what to create the #defines in the first place? Simple, I looked them up in GBATEK, the essential reference to GBA programming. For every IO register I use in these pages I’ll give a description of the bits and a list of #defines as they’re defined in libtonc. The formats for these descriptions were given in the preface, and the table for REG_DISPCNT can be found in the video chapter.
Actually plotting the pixels is now done with the inline function m3_plot(), which is formatted much the same way as every kind of pixel plotter in existence: 2 coordinates and the color. Much better than raw memory access, even though it works exactly the same way. The colors themselves are now created with an inline too: RGB15 takes 3 numbers for the red, green and blue components and ties them together to form a valid 16-bit color.
Finally, there is an endless loop to prevent the program from ever ending. But aren’t endless loops bad? Well usually yes, but not here. Remember what happens when PC programs end: control is kicked back to the operating system. Well, we don’t have an operating system. So what happens after main() returns is undefined. It is possible to see what happens by looking at a file called ctrs0.S, which comes with your dev-kit, but that’s not a thing for beginners so at the moment my advice is to simply not let it happen. Ergo, endless loop. For the record, there are better ways of stopping GBA programs, but this one’s the easiest. And now we’ve reached the end of the demo.
Better, no?
And that is what proper code looks like. As a basic rule, try to avoid raw numbers: nobody except you will know what they mean, and after a while you may forget them yourself as well. Typedefs (and enums and structs) can work wonders in structuring code, so can subroutines (functions, inline functions and macros). Basically, every time you notice you are repeating yourself (copy&paste coding), it might be time to think about creating some subs to replace that code.
These are just a few basic guidelines. If you need more, you can find some more here, for example. Google is your friend. Now, if you’ve followed any classes on C, you should already know these things. If not, you have been cheated. Books and tutorials may sometimes skip these topics, so it may be necessary to browse around for more guidelines on programming styles. That’s all they are, by the way: guidelines. While the rules are usually sensible, there’s no need to get fascist about them. Sometimes the rules won’t quite work for your situation; in that case feel free to break them. But please keep in mind that these guidelines have been written for a reason: more often than not you will benefit from following them.
First demo v3?
There are many ways that lead to Rome. You’ve already seen two ways of coding that essentially do the same thing, though one was easily superior. But sometimes things aren’t so clear cut. In many cases, there are a number of equally valid ways of programming. The obvious example is the names you give your identifiers. No one’s forcing you to a particular set of names because it’s not the names that are important, it’s what they stand for. Another point of contention is whether you use macros, functions, arrays or what not for dealing with the memory map. In most cases, there’s no difference in the compiled code.
The code below shows yet another way of plotting the 3 pixels. In this case, I am using the color #defines rather than the RGB inline, but more importantly I’m using an array typedef M3LINE with which I can map VRAM as a matrix so that each pixel is represented by a matrix element. Yes, you can do that, and in some way it’s even better than using an inline or macro because you’re not limited to just setting pixels; getting, masking and what not are all perfectly possible with a matrix, but if you were to go the subroutine way, you’d have to create more for each type of action.
As you can see, there’s all kinds of ways of getting something done, and some are more practical than others. Which one is appropriate for your situation is pretty much up to you; it’s just part of software design.
#include "toolbox.h"

// extra stuff, also in tonc_video.h
#define M3_WIDTH    SCREEN_WIDTH
// typedef for a whole mode3 line
typedef COLOR       M3LINE[M3_WIDTH];
// m3_mem is a matrix; m3_mem[y][x] is pixel (x,y)
#define m3_mem    ((M3LINE*)MEM_VRAM)

int main()
{
    REG_DISPCNT= DCNT_MODE3 | DCNT_BG2;

    m3_mem[80][120]= CLR_RED;
    m3_mem[80][136]= CLR_LIME;
    m3_mem[96][120]= CLR_BLUE;

    while(1);
    return 0;
}
General notes on GBA programming
Console programming is substantially different from PC programming, especially for something like the GBA. There is no operating system, no complex API to learn, it’s just you against the memory. You need to have intimate knowledge of the GBA memory sections to make things work, and good pointer and bit-operation skills are a must. Also remember that you don’t have a 2GHz CPU, half a gig of RAM and a GPU that can do a gazillion polygons per second. It’s just a 16 MHz CPU with 96kB video memory. And no floating point support or even hardware division. These are all things you need to be aware of when designing your GBA software.
Another thing that you need to remember is that the GBA has a tendency to do things just a tiny bit different than you may expect. The primary example of this is the matrix used for affine transformations like rotation and scaling. All of the popular tutorials give the wrong matrix for a rotation-scale transformation, even though the reference documents give the correct description of each element. Other good examples are the end result of trying to write a single byte to VRAM, the fact that bits for key-states are actually set when the button’s unpressed instead of the other way around, or what the timer register REG_TMxD really does.
I’ve tried to be complete in my explanations of all these things, but I’m positive I’ve missed a thing or two. If you encounter problems, you’re probably not the first one. There are plenty of FAQs and forums where you can find the solution. If that fails, it never hurts to ask. If any of my information is incorrect or incomplete, please don’t hesitate to tell me.
GBA Good/bad practices
For some reason, there are a lot of bad programming practices among the GBA development community. The main reason for this is probably that people just copy-paste from tutorial code, most of which use these practices. Here’s a short list of things to avoid, and things to adopt.
-
Don’t believe everything you read. Bottom line: people make mistakes. Sometimes, the information that is given is incorrect or incomplete. Sometimes the code doesn’t work; sometimes it does, but it’s inefficient or inconsistent or just contains practices that will come back to bite you later on. This is true for most (if not all) older tutorials. Don’t automatically assume you’re doing it wrong: there is a chance it’s the source material.
Unfortunately, if you’re new to programming you might not recognize the bad and adopt the standards exhibited by some sources. Do not learn C programming from GBA tutorials! I’d almost extend that suggestion to on-line tutorials in general, especially short ones. Books are usually more accurate and provide a better insight into the material. (But again, not always.)
-
RTFAQ / RTFR. Read the gbadev forum FAQ. Should go without saying. It covers a lot of common problems. Additionally, read the fuckin reference, by which I mean GBATEK, which covers just about everything.
-
Makefiles are good. Many tutorials use batchfiles for building projects. This is a very easy method, I agree, but in the long run, it’s very inefficient, Windows only and is prone to maintainability problems. Makefiles are better for Real World projects, even though there may be a hurdle setting them up initially. Fortunately, you don’t have to worry about it that much, because DevkitPro comes with a template makefile/project (see
${DEVKITPRO}/examples/gba/template) where all you need to do is say in which directories the source/header/data files are kept. The makefiles I use for the advanced and lab projects are an adaptation of these. -
Thumb-code is good. The standard sections for code (ROM and EWRAM) have 16bit buses. ARM instructions will clog the bus and can seriously slow down performance. Thumb instructions fit better here. Thumb code is often smaller too. Note that because of the 32bit bus of IWRAM, there is no penalty for ARM code there.
-
Enabling interworking, optimizations and warnings are good. Interworking (
-mthumb-interwork) allows you to use switch between ARM and Thumb code; you may want this if you have a few high-performance routines in ARM/IWRAM that you want to call from ROM code. Optimizations (-O#) make GCC not be an idiot when compiling C into machine code (I’m serious: without them the output is attrociously bad in every way). It produces faster code, and usually smaller as well. Warnings-Wallshould be enabled because you will do stupid things that will produce compilable output, but won’t do what you expected. Warnings are reminders that something funky may be going on. -
32bit variables are good. Every CPU has a ‘native’ datatype, also known as the word, or in C-speak, the
int. Generally speaking, the CPU is better equipped to deal with that datatype than any other. The GBA is called a 32bit machine because the CPU’s native datatype is 32-bit. The instruction sets are optimised for word-sized chunks. It likes words, so you’d better feed it words unless you have no other choice.In a very real way, the 32bit integer is the only datatype the GBA has. The rest are essentially emulated, which carries a small performance penatly (2 extra shift instructions for bytes and halfwords). Do not use
u8oru16for loop-indices for example, doing so can cut the speed of a loop in half! (The belief that using smaller types means lower memory-use only holds for aggregates and maybe globals; for local variables it actually costs memory). Likewise, if you have memory to copy or fill, using words can be about twice as fast as halfwords. Just be careful when casting, because an ARM CPU is very picky when it comes to alignment. -
Data in header files is bad, very bad. I’ll go in a little detail about it when talking about data. And see also here and here.
Those are points where other GBA tutorials often err. It’s not an exclusive list, but the main points are there I think. There are also a few things on (C) programming in general that I’d like to mention here.
-
Know the language; know the system. It should go without saying that if you’re programming in a certain language or on a certain system, you should know a little (and preferably a lot) about both. However, I have seen a good deal of code that was problematic simply because the author apparently didn’t know much about either. As I said in the beginning of this section, the GBA has a few interesting quirks that you need to know about when programming for it. That, of course, is what Tonc is all about. Some things stem from lack of C skills – the ‘int’-thing is an example of this. Another very common problem is correct memory and pointer use, something that I will cover a little later and also in the section on data. With C, you have different kinds of datatypes, pointers, the preprocessor and bit-operators at your disposal. Learn what they do and how to use them effectively.
-
Think first, code later. Don’t open up an editor, type some code and hope it works correctly. It won’t. How can it, if you haven’t even defined what ‘correctly’ means? Think of what you want to do first, then what you need to get it done and then try to implement it.
A lot of programming (for me anyway) is not done in a text editor at all. For example, for anything involving math (which can include graphics as well), it’s better to make a diagram of the situation. I have pages of diagrams and equations for the affine transformation and mode 7, just to see what what going on. Pen and paper are your friends here.
-
Learn to generalize and simplify. This is actually not about programming, but problem-solving in general. Specific problems are often special cases of more general problems. For example, 2D math is a subset of multi-dimensional math; vector analysis and transformations such as rotations and scaling are parts of linear algebra. If you know the general solution, you can always (well, often, at any rate) work down to the specific case. However, what is often taught (in school, but in universities as well) are the specific solutions, not the general ones. While using the special case solutions are often faster in use, they won’t work at all if the case is just a little different than the example in the book. If you’d learned the general solution – better yet, how to arrive at the general solution – you’d stand a much better change of solving the task at hand.
A related issue is simplification. For example, if you have long expressions in a set of equations (or algorithms), you can group them to together under a new name. This means less writing, less writing and a lower risk of making a mistake somewhere.
-
Learn basic optimization strategies. By this I don’t mean that you should know every trick in the book, but there are a few things that you can use in writing code that can speed things up (sometimes even significantly) without cost to readbility and maintainability. In fact, sometimes the code actually becomes easier to read because of it. A few examples:
- Use a better algorithm. Okay, so this one may not always be simple, but it’s still very true.
- Use ints. The
intis loosely defined as the native datatype. Processors tend to perform better when they deal with their native datatype. - Use temporary variables for common expressions. If you use a long expression more than a few times, consider dumping it in a temp. This means less writing for you, and less reading for everyone. It can also make your code faster because you don’t need to evaluate the entire expression all the time. This is especially true for global variables, which have to be reloaded after each function-call because the values may have changed.
- Use pointers. Pointers have the reputation of being dangerous, but they’re a very powerful tool if used correctly. Pointer arithmetic is usually faster than indexing because it’s closer to hardware, and by assigning temp pointers to deeply nested structure expressions (see above), you can greatly reduce the length of the expressions, which makes things easier on the compiler and the reader alike.
- Precalculate. This is related to the previous two points. If you have a loop in which things don’t depend on the loop-variable, precalculate that part before the loop. Also, to avoid (complex) calculations, you could dump the data in a Look-up Table and simply grab a value from there.
- Avoid branches. Things that redirect program flow (ifs, loops, switches) generally cost more than other operations such as arithmetic. Sometimes it’s possible to effectively do the branch with arithmetic (for example,
(int)x>>1gives −1 or 0, depending on the sign of x) There are many more optimization techniques, of course. Wikipedia has a nice overview, and you can find pages discussing particular techniques here[b0rked] and there. Some of these techniques will be done by the compiler anyway, but not always.
-
Learn to optimize later. Also known as “premature optimization is the root of all evil”. Optimization should be done in the final stages, when most code is in pace and you can actually tell where optimization is necessary (if it’s necessary at all). However, this does not mean you should actually strive for the slowest solution in the early phases. Often there is a cleaner and/or faster (sometimes even much faster) algorithm then the trivial one, which will come to you with just a small amount of thought. This isn’t optimization, it’s simply a matter of not being stupid. A few of the points mentioned above fall in this category.
-
There are always exceptions. There is no programming guideline that doesn’t have its exception. Except maybe this one.
I’ll leave it at that for now. Entire books have been written on how to code efficiently. Resources are available on the web as well: search for things like “optimization”, “coding standards” or “coding guidelines” should give you more than enough. Also look up Design Pattern and Anti-pattern. Also fun are books and sites that show how not to code. Sometimes these are even more useful. Worse than Failure is one of these (in particular the codeSOD category); The programming section of Computer stupidities is also nice. If you want to see why the use of global variables is generally discouraged, do a search for ‘alpha’ in the latter page.
A few examples of good/bad practices
Here are a few examples of code that, while functional, could be improved in terms of speed, amount of code and/or maintainability.
Ints versus non-ints
Above, I noted that use of non-ints can be problematic. Because this bad habit is particularly common under GBA and NDS code (both homebrew and commercial), I’d like to show you an example of this.
// Force a number into range [min, max>
#define CLAMP(x, min, max)   \
    ( (x)>=(max) ? ((max)-1) : ( ((x)<(min)) ? (min) : (x) ) )

// Change brightness of a palette (kinda) (70)
void pal_brightness(u16 *pal, u16 size, s8 bright)
{
    u16 ii;
    s8 r, g, b;

    for(ii=0; ii<size; ii++)
    {
        r= (pal[ii]    )&31;
        g= (pal[ii] >>5)&31;
        b= (pal[ii]>>10)&31;

        r += bright;    r= CLAMP(r, 0, 32);
        g += bright;    g= CLAMP(g, 0, 32);
        b += bright;    b= CLAMP(b, 0, 32);

        pal[ii]= r |(g<<5) | (b<<10);
    }
}
This routine brightens or darkens a palette by adding a brightness-factor to the color components, each of which is then clamped to the range [0,31⟩ to avoid funky errors. The basic algorithm is sound, even the implementation is, IMHO, pretty good. What isn’t good, however is the datatypes used. Using s8 and u16 here adds an extra shift-pair practically every time any variable is used! The loop itself compiles to about 90 Thumb instructions. In contrast, when using ints for everything except pal the loop is only 45 instructions long. Of course the increase in size means an increase in time as well: the int-only version is 78% faster than the one given above. To repeat that: the code has doubled in size and slowed down by 78% just by using the wrong datatype!
I’ll admit that this example is particularly nasty because there is a lot of arithmetic in it. Most functions would incur a smaller penalty. However, there is no reason for losing that performance in the first place. There is no benefit of using s8 and u16; it does not increase redability – all it does is cause bloat and slow-down. Use 32-bit variables when you can, the others only when you have to.
Now, before this becomes another goto issue, non-ints do have their place. Variables can be divided into two groups: worker variables (things in registers) and memory variables. Local variables and function parameters are worker variables. These should be 32-bit. Items that are in memory (arrays, globals, structs, and what not) could benefit from being as small as possible. Of course, memory variables still have to be loaded into registers before you can do anything with them. An explicit local variable may be useful here, but it depends on the case at hand.
Pointer problems
One of the most common mistakes GBA neophytes make is mixing up array/pointer sizes when copying data. Data is data, but you can access it in different ways. For example, here’s code that copies bitmap-data from an array into VRAM.
// An array representing a 240x160@16 bitmap, converted
// to an array by some graphics conversion tool.
const u8 fooBitmap[240*160*2]=
{
    // Maaaaany, many lines of data.
}

int main()
{
    REG_DISPCNT= DCNT_MODE3 | DCNT_BG2;

    // Copy 240x160 pixels to VRAM (ORLY?)
    int ii;
    for(ii=0; ii<240*160; ii++)
        vid_mem[ii]= fooBitmap[ii];

    return 0;
}
The fooBitmap array represents some bitmap. In order to display that bitmap on the screen, you need to copy its data into VRAM. That’s simple enough: we have vid_mem from before, and we can copy from fooBitmap to VRAM by copying elements using a simple for-loop.
However, it’s not quite as simple as that. vid_mem is an u16 array; so defined because in mode 3 each pixel is an 16-bit color. But fooBitmap is a byte-array: two elements of this array represent one color, and copying bytes-to-halfwords leaves the top-byte of each pixel empty, giving a very skewed result. Such a source-destination is incredibly common, partly because people don’t know how pointers and arrays represent memory, but also because they don’t pay attention to the datatype.
Here’s a version that would work:
// An array representing a 240x160@16 bitmap, converted
// to an array by some graphics conversion tool.
const u8 fooBitmap[240*160*2]=
{
    // Maaaaany, many lines of data.
}

int main()
{
    REG_DISPCNT= DCNT_MODE3 | DCNT_BG2;

    u16 *src= (u16*)fooBitmap;  // Cast source to u16-array

    // Copy 240x160 pixels to VRAM (YARLY!)
    int ii;
    for(ii=0; ii<240*160; ii++)
        vid_mem[ii]= src[ii];

    return 0;
}
By ensuring the source and destinations are of the same type, the copying leaves no gaps. Note that the underlying data hasn’t changed – only how it’s used. There are actually a lot more things you need to know about how to use data and memory, which will be covered in a later chapter.
Simplification
Consider the following function (basically taken from the Rinkworks site mentioned earlier):
int foo(int x)
{
    switch(x)
    {
    case 1: return 1;
    case 2: return 2;
    case 3: return 3;
    case 4: return 4;
    case 5: return 5;
    case 6: return 6;
    case 7: return 7;
    }
    return 0;
}
What this function does is this: if x is between 1 and 7, return that number, otherwise return 0. The thing to note is that the case-value and the return code are the same, so instead of the switch-block you could have just returned x.
int foo(int x)
{
    if(x >= 1 && x <= 7)
        return x;
    else
       return 0;
}
Simplifications like this often present themselves if you just think about what you’re doing for a little while, rather than just entering code. Now, this would should be rather obvious, but more difficult switch-blocks can often be replaced by something like this as well. For example, if there is a simple mathematical relation between the input and the return value (some addition or multiplication, for example), you can just use that relation. Even if there is not such a simple relation, there can be possibilities. If you’re returning constants, you could put those constants in a table and use x as an index.
The above is a simplification in terms of the algorithm used. Another kind of simplification is in readability. Of course, everybody has their own ideas about what’s readable. Personally, I prefer to keep my statements short, especially in the place where the action happens. The next function is an example of bounding circle collision detection. Basically, you have two circles at points p1 = (x1, y1) and p2 = (x2, y2) and radii r1 and r2. The distance between these two points can be calculated with the Pythagorean theorem. If this distance is smaller than the sum of the two radii, the circles overlap. A function that checks whether the player sprite hits any of the enemy sprites could look something like this:
// Some basic structs and a sprite array.
// #defines for sprite-indices and amounts omitted.
typedef struct { int x, y; } POINT;

typedef struct
{
    POINT position;
    int radius;
} TSprite;

TSprite gSprites[SPRITE_MAX];

// Collision function.

int player_collision()
{
    int ii;

    for(ii=0; ii<ENEMY_MAX; ii++)
    {
        // Test for hit between player and enemy ii
        if( (gSprites[ENEMY_ID+ii].position.x - gSprites[PLAYER_ID].position.x) *
            (gSprites[ENEMY_ID+ii].position.x - gSprites[PLAYER_ID].position.x) +
            (gSprites[ENEMY_ID+ii].position.y - gSprites[PLAYER_ID].position.y) *
            (gSprites[ENEMY_ID+ii].position.y - gSprites[PLAYER_ID].position.y) <
            (gSprites[ENEMY_ID+ii].radius + gSprites[PLAYER_ID].radius) *
            (gSprites[ENEMY_ID+ii].radius + gSprites[PLAYER_ID].radius) )
        {
            return 1;
        }
    }

    // Not hit
    return 0;
}
Personally, I have a hard time reading what actually goes on inside the if-statement there. Because the expression is 6 lines long, I actually have to sit down and parse what it actually does, and hope that the parentheses are all correct, etc. Now, note that a number of things are used multiple times here: the gSprites accesses (6× for the player, 6× for the enemy) and then the positions as well. These can all be accessed with less code by using pointers and other local variables. Also, the player’s attributes are loop invariant (they don’t change during the loop), so they can be loaded outside the loop.
int player_collision()
{
    int ii;
    int r1= gSprites[PLAYER_ID].radius, r2, dx, dy;
    POINT *pt1= &gSprites[PLAYER_ID].position, *pt2;
    TSprite *enemy= &gSprites[ENEMY_ID];

    for(ii=0; ii<ENEMY_MAX; ii++)
    {
        r2= enemy[ii].radius;
        pt2= &enemy[ii].position;
        dx= pt2->x - pt1->x;
        dy= pt2->y - pt1->y;

        // Test for hit between player and enemy ii
        if( dx*dx + dy*dy < (r1+r2)*(r1+r2) )
            return 1;
    }

    // Not hit
    return 0;
}
There may not have been a real change in the number of lines, but the lines themselves are shorter and easier to read. Also, instead of a 6-line if-expression, it now fits on a single line and you can actually see what it does. Personally, I’d call that a win.
Testing your code on a real GBA
If you’re just starting GBA programming, chances are you’re using the emulators that are out there, and will be content with those. However, if you look through the forums you’ll see many people urging you to test on hardware regularly. They are absolutely right.
Now, it isn’t that the emulators are bad. On the contrary, in fact; the most popular emulators have things like tile, map and memory viewers that are essential to debugging. An emulator like VBA is very, very good, but not quite perfect. Take the Tonc demos, for example: they run the same on VBA as on a real GBA in all cases … mostly. For one thing, timing is a real issue on most of them (the exception here is no$gba, which I’ve never seen off the mark by more than 2%, usually a lot less). Also, in a few rare occasions (like in cbb_demo and win_demo) there were small but important differences between GBA and emulator outputs, and if you’ve never tested on the real thing, you’d never know.
One other thing that is very different is the colors. Since it’s not back-lit the GBA screen is much darker than a PC monitor. Or maybe that’s just my room ;). Also, on an emulator you have the luxury of scaling your view; the real GBA is always 3“ screen. There’s world of difference, trust me on this. Take that first.gba example I showed above: the pixels are so tiny it’s almost impossible to see on a real GBA! Even an 8x8 tile is pretty small. Also, the use of a keyboard in an emu is nothing like holding a real GBA in your hands.
And, of course, the whole idea of creating something that works on a console has an air of coolness that defies description. Well, almost anyway. The word is progasm. Says it all really, doesn’t it?
Multiboot & linkers
OK, so now you know you should test on hardware, how do you do it? After all, you can’t exactly plug a GBA into your PC like a USB memory stick or a printer? Well, yes you can … with the right equipment. The two most common ways are a multiboot cable or a flash linker.
Flash Card & Linker
A flash card is a GBA cart with a difference: it is completely rewritable. There are a number of different sets available: different sized carts (64Mbit to 1024Mbit), USB or Parallel port versions; sets that use a separate linker (where you have to take the cart out of the GBA, write to it, and reinsert) or ones that write directly to the cart or transfer through the multiboot port. Ideally you’d use one of these. However, they can be rather pricy ($60 - $200 (and up?)) and generally only available through online stores, which also means shipping and taxes and such.
Multimedia cards
A solution that’s becoming more and more popular is using standard multimedia cards (eg. SD, CompactFlash) and an adapter like GBAMP and SuperCard. Memory cards can be very cheap (like $10) and bought in most electronics stores; the adapters are genereally $25 and up.
SuperCard vs waitstates
There is one small technical problem with SuperCards: they use slow memory that doesn’t support 3/1 ROM waitstates. This is a faster setting than the default 4/2 and anything that uses the former simply won’t run. This shouldn’t be a problem with most homebrew things, but a handful of binaries will fail and you wouldn’t be able to make use of the speed-up yourself either.
Multiboot cable
The other way is a multiboot cable. This is a cable that plugs into the GBA multiboot port (like multiplayer games do) and one of the PC ports, usually the parallel port. These are a lot cheaper than a flash kit. You can even build one yourself :)! You can find the instructions and necessary software to build an Xboo communication cable on www.devkitpro.org, which works like a charm. Basically all you need to do is connect one end of the link cable to a male parallel port cable. If you shop around you should be able to get all you need for as little as $5.
But, like always, there’s no such thing as a free lunch. What happens in a multiboot game is that the code is written to EWRAM. That’s how you can use one cart in a multiplayer game. The multiboot cable is the same thing, only with the PC as the host. The trouble is that EWRAM is only 256kb in size; you won’t be able to fit an entire game on it. And, of course, it runs always through your computer, so unless you have a laptop, forget about taking it outside to show off to your friends.
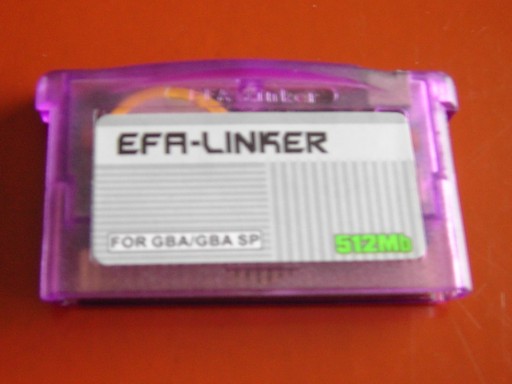 Fig 3.2: efa flash card. |
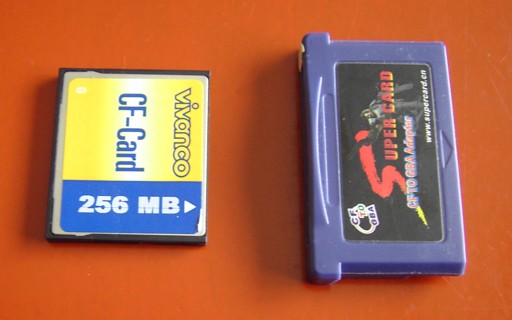 Fig 3.3: SuperCard, compact flash version. |
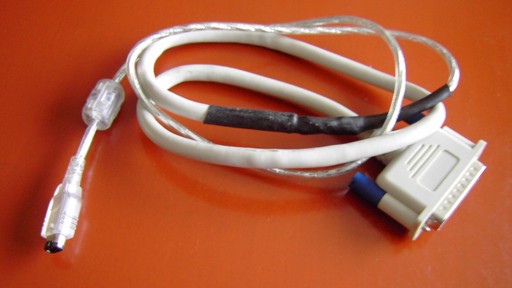 Fig 3.4: xboo multiboot cable. |
Compiling for real hardware
This is almost the same as for emulators. The only real things you have to worry about are a) that you can only use the binary after the objcopy treatment, and b) that you need to have a valid GBA header, which it usually doesn’t. If the intro screen shows “Game Boy” as normal, but the “Nintendo” at the bottom is garbled, you have a bad header. To get a valid header, use a program called gbafix.exe. This is originally by darkfader, but you can also find it at www.devkitpro.org. I already mentioned the extra steps for a multiboot game earlier.
Flash kits usually come with software that can take care of all this stuff for you (or so I’m told, I don’t have one). The Xboo zip-file also has a little app that sends your binary to the GBA.