8. Regular sprites
- Sprite introduction
- Sprite image data and mapping mode
- Sprite control: Object Attribute Memory
- Object attributes: OBJ_ATTR
- Bitfield macros (OAM or otherwise)
- Demo time
Sprite introduction
 Fig 8.1. Metroid. Rawr.
According to Webster’s, a sprite is “an imaginary being or spirit, as a fairy, elf, or goblin”. Right, glad that’s cleared up. For games, though, when referring to a sprite one is usually talking about “a [small] animated object that can move freely from the background” (PERN). Primary examples are game characters, but status objects like scores and life bars are often sprites as well. Fig 8.1 on the right shows a sprite of everybody’s favorite vampire jellyfish, the metroid. I will use this sprite in the demo at the end of this chapter.
Sprites are a little trickier to use than a bitmap background, but not by much. You just have to pay a little more attention to what you’re doing. For starters, the graphics have to be grouped into 8×8 tiles; make sure your graphics converter can do that. Aside from the obvious actions such as enabling sprites in the display control and loading up the graphics and palette, you also have to set-up the attributes of the sprites correctly in OAM. Miss any of these steps and you’ll see nothing. These things and more will be covered in this chapter.
Essential Sprite Steps
There are 3 things that you have to do right to get sprites to show up:
- Load the graphics and palette into object VRAM and palette.
- Set attributes in OAM to use the appropriate tiles and set the right size.
- Switch on objects in
REG_DISPCNT, and set the mapping mode there too.
Sprites aren’t objects
Or something like that. I know it sounds weird, but the more I think about it, the more I realize that sprites and objects shouldn’t be considered interchangeable. The term ‘object’, is a hardware feature, controlled in OAM. Right now, I think that ‘sprite’ is more of a conceptual term, and should be reserved for actors, like playing characters, monsters, bullets, etc. These can in fact be built up of multiple hardware objects, or even use a background.
You could also thing of it in this way: objects are system entities linked to the console itself, and sprites are game entities, living in the game world. The difference may be subtle, but an important one.
This is merely my opinion, and I can’t say how right I am in this. Tonc still switches back and forth between the two words because it’s too late to do anything about it now. Mea culpa. I’d love to hear the opinion of others on the subject, so feel free to speak your mind if you want.
Sprite image data and mapping mode
Like I said in the sprite and background overview, sprites are composed of a number of 8×8-pixel mini-bitmaps called tiles, which come in two types: 4bpp (s-tiles, 32 bytes long) and 8bpp (d-tiles, 64 bytes long). The tiles available for sprites are stored in object VRAM, or OVRAM for short. OVRAM is 32 KiB long and is mapped out by the last two charblocks of tile_mem, which are also known as the lower (block 4, starting at 0601:0000h) and higher (block 5, 0601:4000h) sprite blocks. Counting always starts at the lower sprite-block and is always done in 32 byte offsets, meaning that sprite-tile #1 is at 0601:0020h, no matter what the bit depth is (see table 8.1). With 4000h bytes per charblock, a quick calculation will show you that there are 512 tiles in each charblock, giving a total range of 1024. However, since the bitmap modes extend into the lower sprite block, you can only use the higher sprite block (containing tiles 512 to 1023) in modes 3-5.
It may seem that calculating those tile addresses can be annoying, and it would be if you had to do it manually. That’s why I have mapped the whole of VRAM with a charblock/tile matrix called tile_mem, as discussed in the overview. Need tile #123 of OVRAM? That’d be tile_mem[4][123]. Need its address? Use the address operator: &tile_mem[4][123]. Quick, easy, safe.
Also, don’t forget that the sprites have their own palette which starts at 0500:0200h (right after the background palette). If you are certain you’ve loaded your tiles correctly but nothing shows up, it’s possible you filled the wrong palette.
| memory 0601: | 0000 | 0020 | 0040 | 0060 | 0080 | 0100 | ... |
|---|---|---|---|---|---|---|---|
| 4bpp tile | 0 | 1 | 2 | 3 | 4 | 5 | |
| 8bpp tile | 0 | 2 | 4 | ||||
Bitmap modes and Object VRAM
Only the higher sprite block is available for sprites in modes 3-5. Indexing still starts at the lower block, though, so the tile range is 512-1023.
The sprite mapping mode
Sprites aren’t limited to a single tile. In fact, most sprites are larger (see Table 8.3 for a list of the available sizes for GBA sprites). Larger sprites simply use multiple tiles, but this may present a problem. For backgrounds, you choose each tile explicitly with the tile-map. In the case of sprites, you have two options: 1D and 2D mapping. The default is 2D mapping, and you can switch to 1D mapping by setting REG_DISPCNT{6}.
How do these work? Consider the example sprite of fig 8.2a, showing the metroid of fig 8.1 divided into tiles. In 2D mapping, you’re interpreting the sprite charblocks as one big bitmap of 256×256 pixels and the sprite a rectangle out of that bitmap (still divided into tiles, of course). In this case, each tile-row of a sprite is at a 32-tile offset. This is shown in fig 8.2b. On the other hand, you can also consider the charblocks as one big array of tiles, and the tiles of every sprite are consecutive. This is shown in fig 8.2c. The numbers in fig 8.2a show the difference between 1D and 2D mapping. Assuming we start at tile 0, the red and cyan numbers follow 2D and 1D mapping, respectively.
From a GBA-programming viewpoint, it is easier to use 1D mapping, as you don’t have to worry about the offset of each tile-row when storing sprites. However, actually creating sprites is easier in 2D mode. I mean, do you really want to edit a bitmap tile by tile? That’s what I thought. Of course, it should be the exporting tool’s job to convert your sprites from 2D to 1D mapping for you. You can do this with Usenti too.
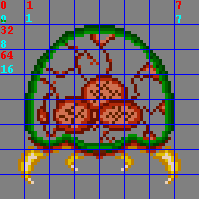 Fig 8.2a: zoomed out version of
Fig 8.1, divided into tiles; colored numbers
indicate mapping mode: red for 2D, cyan for 1D.
Fig 8.2a: zoomed out version of
Fig 8.1, divided into tiles; colored numbers
indicate mapping mode: red for 2D, cyan for 1D.
|
 Fig 8.2b: how
fig 8.2a should be stored in memory when
using 2D mapping.
Fig 8.2b: how
fig 8.2a should be stored in memory when
using 2D mapping.
 Fig 8.2c: how
fig 8.2a should be stored in memory when using
1D mapping.
Fig 8.2c: how
fig 8.2a should be stored in memory when using
1D mapping.
|
Object data conversion via CLI
Some command-line interfaces can tile bitmaps for use with objects (and tilemaps). In some cases, they can also convert images with multiple sprite-frames to a set of object tiles in 1D object mapping mode. If foo.bmp is a 64×16 bitmap with 4 16×16 objects, here’s how you can convert it to 8×8 4bpp tiles using gfx2gba and grit (flags for 1D mapping are given in brackets)
# gfx2gba
# 4x 16x16@4 objects (C array; u8 foo_Bitmap[], u16 master_Palette[]; foo.raw.c, master.pal.c)
    gfx2gba -fsrc -c16 -t8 [-T32] foo.bmp
# grit
# 4x 16x16@4 objects (C array; u32 fooTiles[], u16 fooPal[]; foo.c, foo.h)
    grit foo.bmp -gB4 [-Mw 2 -Mh 2]
Two notes on the 1D mapping flags here. First, gfx2gba can only meta-tile (-T) square objects; for something like 16×8 objects you’d need to do the 1D mapping yourself. Second, grit’s meta-tiling flags (-Mw and -Mh) can be anything, and use tile units, not pixels.
Size units: tiles vs pixels
The default unit for bitmap dimensions is of course the pixel, but in tiled graphics it is sometimes more useful to use tiles as the basic unit, that is, the pixel size divided by 8. This is especially true for backgrounds. In most cases the context will suffice to indicate which one is meant, but at times I will denote the units with a ‘p’ for pixels or ‘t’ for tiles. For example, a 64x64p sprite is the same as a 8×8t sprite.
Sprite control: Object Attribute Memory
Much unlike in the bitmap modes, you don’t have to draw the sprites yourself: the GBA has special hardware that does it for you. This can get the sprites on screen faster than you could ever achieve programmatically. There are still limits, though: there is a limit to the amount of sprite pixels you can cram in one scanline. About 960, if the fora are anything to go by.
So you don’t have to draw the sprites yourself; however, you do need to tell the GBA how you want them. This is what the Object Attribute Memory –OAM for short– is for. This starts at address 0700:0000h and is 1024 bytes long. You can find two types of structures in OAM: the OBJ_ATTR struct for regular sprite attributes, and the OBJ_AFFINE struct containing the transformation data. The definitions of these structures can be found below. Note that names may vary from site to site.
typedef struct tagOBJ_ATTR
{
    u16 attr0;
    u16 attr1;
    u16 attr2;
    s16 fill;
} ALIGN4 OBJ_ATTR;

typedef struct OBJ_AFFINE
{
    u16 fill0[3];
    s16 pa;
    u16 fill1[3];
    s16 pb;
    u16 fill2[3];
    s16 pc;
    u16 fill3[3];
    s16 pd;
} ALIGN4 OBJ_AFFINE;
There are a few interesting things about these structures. First, you see a lot of filler fields. Second, if you would take 4 OBJ_ATTR structures and lay them over one OBJ_AFFINE structure, as done in table 8.2, you’d see that the fillers of one would exactly cover the data of the other, and vice versa. This is no coincidence: OAM is in fact a weave of OBJ_ATTRs and OBJ_AFFINEs. Why would Nintendo use a weave instead of simply having one section of attributes and one for transform data? That’s a good question and deserves a good answer. When I have one, I’ll tell you (I’m guessing it’s a data-alignment thing). Also, note that the elements of the OBJ_AFFINE are signed shorts. I’ve gone through a world of hurt with the obj_aff code because I used u16 instead of s16. With 1024 bytes at our disposal, we have room for 128 OBJ_ATTR structures and 32 OBJ_AFFINEs. The rest of this file will explain regular sprites that only use OBJ_ATTR. I want to give the affine transformation matrix the full mathematical treatment it deserves and will save affine sprites for later.
| mem (u16) | 0 | 3 | 4 | 7 | 8 | b | c | f |
|---|---|---|---|---|---|---|---|---|
| OBJ_ATTR | 0 1 2 | 0 1 2 | 0 1 2 | 0 1 2 | ||||
| OBJ_AFFINE | pa | pb | pc | pd |
Force alignment on OBJ_ATTRs
As of devkitARM r19, there are new rules on struct alignments, which means that structs may not always be word aligned, and in the case of OBJ_ATTR structs (and others), means that struct copies like the one in oam_update() later on, will not only be slow, they may actually break. For that reason, I will force word-alignment on many of my structs with ALIGN4, which is a macro for __attribute__((aligned(4))). For more on this, see the section on data alignment.
Object attributes: OBJ_ATTR
The basic control for every sprite is the OBJ_ATTR structure. It consists of three 16-bit attributes for such qualities as size, shape, position, base tile and more. Each of the three attributes is covered below.
Attribute 0
The first attribute controls a great deal, but the most important parts are for the y coordinate, and the shape of the sprite. Also important are whether or not the sprite is transformable (an affine sprite), and whether the tiles are considered to have a bit depth of 4 (16 colors, 16 sub-palettes) or 8 (256 colors / 1 palette).
| F E | D | C | B A | 9 8 | 7 6 5 4 3 2 1 0 |
| Sh | CM | Mos | GM | OM | Y |
| bits | name | define | description |
|---|---|---|---|
| 0-7 | Y | ATTR0_Y# | Y coordinate. Marks the top of the sprite. |
| 8-9 | OM | ATTR0_REG, ATTR0_AFF, ATTR0_HIDE, ATTR0_AFF_DBL. ATTR0_MODE# | (Affine) object mode. Use to hide the sprite or govern
affine mode.
|
| A-B | GM | ATTR0_BLEND, ATTR0_WIN. ATTR0_GFX# | Gfx mode. Flags for special effects.
|
| C | Mos | ATTR0_MOSAIC | Enables mosaic effect. Covered here. |
| D | CM | ATTR0_4BPP, ATTR0_8BPP | Color mode. 16 colors (4bpp) if cleared; 256 colors (8bpp) if set. |
| E-F | Sh | ATTR0_SQUARE, ATTR0_WIDE, ATTR0_TALL. ATTR0_SHAPE# | Sprite shape. This and the sprite's size
(attr1{E-F}) determines the sprite's real size, see
table 8.4.
|
Two extra notes on attribute 0. First, attr0 contains the y coordinate; attr1 contains the x coordinate. For some reason I keep messing these two up; if you find your sprite is moving left when it should be moving up, this may be why. Second, the affine and gfx modes aren’t always named as such. In particular, attr0{9} is simply referred to as the double-size flag, even though it only works in that capacity if bit 8 is set too. If it isn’t, then it hides the sprite. I think that it’s actually taken out of the object rendering stage entirely leaving more time for the others, but I’m not 100% sure of that.
| shape\size | 00 | 01 | 10 | 11 |
|---|---|---|---|---|
| 00 | 8×8 | 16×16 | 32×32 | 64×64 |
| 01 | 16×8 | 32×8 | 32×16 | 64×32 |
| 10 | 8×16 | 8×32 | 16×32 | 32×64 |
Attribute 1
The primary parts of this attribute are the x coordinate and the size of the sprite. The role of bits 9 to 13 depend on whether or not this is a affine sprite (determined by attr0{8}). If it is, these bits specify which of the 32 OBJ_AFFINEs should be used. If not, they hold flipping flags.
| F E | D | C | B A 9 | 8 7 6 5 4 3 2 1 0 |
| Sz | VF | HF | - | X |
| - | AID | - | ||
| bits | name | define | description |
|---|---|---|---|
| 0-8 | X | ATTR1_X# | X coordinate. Marks left of the sprite. |
| 9-D | AID | ATTR1_AFF# | Affine index. Specifies the OAM_AFF_ENTY this
sprite uses. Valid only if the affine flag
(attr0{8}) is set.
|
| C-D | HF, VF | ATTR1_HFLIP, ATTR1_VFLIP. ATTR1_FLIP# | Horizontal/vertical flipping flags. Used only if
the affine flag (attr0) is clear; otherwise they're
part of the affine index.
|
| E-F | Sz | ATTR1_SIZE# | Sprite size. Kinda. Together with the shape bits
(attr0{E-F}) these determine the sprite's real size,
see table 8.3.
|
I’ll say it here too: attr0 contains y, attr1 contains x. Note that bits 12 and 13 have a double role as either flipping flags or affine index. And if you are wondering if you can still flip affine sprites, the answer is yes: simply use negative scales in the matrix.
Attribute 2
This attribute tells the GBA which tiles to display and its background priority. If it’s a 4bpp sprite, this is also the place to say what sub-palette should be used.
| F E D C | B A | 9 8 7 6 5 4 3 2 1 0 |
| PB | Pr | TID |
| bits | name | description | |
|---|---|---|---|
| 0-9 | TID | ATTR2_ID# | Base tile index of sprite. Note that in bitmap modes, this must be 512 or higher. |
| A-B | Pr | ATTR2_PRIO# | Priority. Higher priorities are drawn first (and therefore
can be covered by later sprites and backgrounds). Sprites cover
backgrounds of the same priority, and for sprites of the
same priority, the higher OBJ_ATTRs are drawn first.
|
| C-F | PB | ATTR2_PALBANK# | Palette bank to use when in 16-color mode. Has no effect if
the color mode flag (attr0{C}) is set.
|
Attribute 3
There is no attribute 3. Although the OBJ_ATTR struct does have a fourth halfword, this is only a filler. The memory in that filler actually belongs to the OBJ_AFFINEs. Nobody is to mistreat attr3 in any way … if there’s any affine sprite active.
OAM double buffering
You could write all your sprite data directly to the OAM at 0700:0000h, but that might not always be the best move. If it’s done during VDraw there’s the possibility of tearing. Even worse, you might change the sprite’s tile-index in mid-render so that the top is in one animation frame and the bottom is in another. Not a pretty sight. Actually, this isn’t something to worry about because you can’t update OAM during VDraw; it’s locked then. What’s often done is creating a separate buffer of OAM entries (also known as the object shadow) that can be modified at any time, and then copy that to the real OAM during VBlank. Here’s my take on this.
OBJ_ATTR obj_buffer[128];
OBJ_AFFINE *const obj_aff_buffer= (OBJ_AFFINE*)obj_buffer;
I’m using 128 now, but I suppose you could use a lower number if you don’t use all the sprites. Anyway, now you have a double buffer for both OBJ_ATTR and OBJ_AFFINE data, which is available at any given time. Just make sure you copy it to the real OAM when the time is right.
Bitfield macros (OAM or otherwise)
Setting and clearing individual bits is easy, but sometimes it’s not too convenient to do it all yourself. This is especially true for field of bits like positions or palette banks, which would involve long statements with masks and shifts if you want to do it nicely. To improve on this a little bit, I have a number of macros that may shorted the amount of actual code. There are essentially three classes of macros here, but before I go into that, I have to explain a little bit more about the hashed (foo‘#”) defines in the attribute lists above.
The hash means that for each of these, there will be three #defines with foo as their roots: foo_MASK, foo_SHIFT, and foo(_n). These give the bitmask, bitshift and a bitfield set macro for the corresponding type.
For example, the one attached to the tile index, ATTR2_ID#. The tile index field has 10 bits and starts at bit 0. The corresponding defines therefore are:
// The 'ATTR2_ID#' from the attr2 list means these 3 #defines exist
#define ATTR2_ID_MASK       0x03FF
#define ATTR2_ID_SHIFT           0
#define ATTR2_ID(n)        ((n)<<ATTR2_ID_SHIFT)
Most GBA libraries out there have #defines like these, albeit with different names. The actual macro isn’t 100% safe because it does no range checking, but it’s short and sweet. Now, as far as Tonc’s text is concerned, every time you see the hash in the define list for a register, it’ll have these three #defines to go with that name.
I also have a second batch of macros you can use for setting and getting specific fields, which use the mask and shift names explained above. I’ll admit the macros look horrible, but I assure you they make sense and can come in handy.
// bit field set and get routines
#define BF_PREP(x, name)         ( ((x)<<name##_SHIFT)& name##_MASK  )
#define BF_GET(x, name)          ( ((x) & name##_MASK)>> name##_SHIFT )
#define BF_SET(y, x, name)       (y = ((y)&~name##_MASK) | BF_PREP(x,name) )

#define BF_PREP2(x, name)        ( (x) & name##_MASK )
#define BF_GET2(y, name)         ( (y) & name##_MASK )
#define BF_SET2(y, x, name)      (y = ((y)&~name##_MASK) | BF_PREP2(x, name) )
Well, I did warn you. The name argument here is the foo from before. The preprocessor concatenation operator is use to create the full mask and shift names. Again using the tile-index as an example, these macros expand to the following:
// Create bitfield:
attr2 |= BF_PREP(id, ATTR0_SHAPE);
// becomes:
attr2 |= (id<<ATTR2_ID_SHIFT) & ATTR2_ID_MASK;

// Retrieve bitfield:
id= BF_GET(attr2, ATTR2_ID);
// becomes:
id= (attr2 & ATTR2_ID_MASK)>>ATTR2_ID_SHIFT;

// Insert bitfield:
BF_SET(attr2, id, ATTR2_ID);
// becomes:
attr2= (attr&~ATTR2_ID_MASK) | ((id<<ATTR2_ID_SHIFT) & ATTR2_ID_MASK);
BF_PREP() can be used to prepare a bitfield for later insertion or comparison. BF_GET() gets a bitfield from a value, and BF_SET() sets a bitfield in a variable, without disturbing the rest of the bits. This is basically how bitfields normally work, except that true bitfields cannot be combined with OR and such.
The macros with a ‘2’ in their names work in a similar way, but do not apply shifts. These can be useful when you have already shifted #defines like ATTR0_WIDE, which can’t use the other ones.
// Insert pre-shifted bitfield:
// BF_SET2(attr0, ATTR0_WIDE, ATTR0_SHAPE);
attr0= (attr0&~ATTR0_SHAPE_MASK) | (id & ATTR0_SHAPE_MASK);
Note that none of these three have anything GBA specific in them; they can be used on any platform.
Finally, what I call my build macros. These piece together the various bit-flags into a single number in an orderly fashion, similar to HAM’s tool macros. I haven’t used them that often yet, and I’m not forcing you to, but on occasion they are useful to have around especially near initialization time.
// Attribute 0
#define ATTR0_BUILD(y, shape, bpp, mode, mos, bld, win)             \
(                                                                   \
    ((y)&255) | (((mode)&3)<<8) | (((bld)&1)<<10) | (((win)&1)<<11) \
    | (((mos)&1)<<12) | (((bpp)&8)<<10) | (((shape)&3)<<14)         \
)

// Attribute 1, regular sprites
#define ATTR1_BUILD_R(x, size, hflip, vflip)         \
( ((x)&511) | (((hflip)&1)<<12) | (((vflip)&1)<<13) | (((size)&3)<<14) )

// Attribute 1, affine sprites
#define ATTR1_BUILD_A(x, size, aff_id)               \
( ((x)&511) | (((aff_id)&31)<<9) | (((size)&3)<<14) )

// Attribute 2
#define ATTR2_BUILD(id, pbank, prio)                 \
( ((id)&0x3FF) | (((pbank)&15)<<12) | (((prio)&3)<<10) )
Instead of doing ORring the bitflags together yourself, you can use these and perhaps save some typing. The order of arguments maybe annoying to remember for some, and the amount of safety checking may be a bit excessive (gee, ya think?!?), but if the numbers you give them are constants the operations are done at compile time so that’s okay, and sometimes they really can be helpful. Or not :P. Like I said, I’m not forcing you to use them; if you think they’re wretched pieces of code (and I admit they are) and don’t want to taint your program with them, that’s fine.
Note that with the exception of bpp, the arguments are all shifted by the macros, meaning that you should not use the #define flags from the lists, just small values like you’d use if they were separate variables rather than bits in a variable.
Demo time
Now, to actually use the bloody things. The code below is part of the obj_demo. It is the most complex I’ve shown yet, but if you take it one step at a time you’ll be fine. Essentially, this demo places the tiles of a boxed metroid in the VRAM allotted for objects and then lets you screw around with various OBJ_ATTR bits like position and flipping flags. The controls are as follows:
- Control Pad
Moves the sprite. Note that if you move far enough off-screen, it’ll come up on the other side. - A and B Buttons
Flip the sprite horizontally or vertically, respectively. - Select Button
Makes it glow. Well, makes it palette-swap, actually. Handy for damage-flashing. - Start Button
Toggles between 1D and 2D mapping modes. Fig 8.2b and fig 8.2c should explain what happens. Since the sprite is in 1D mode, there’s really not much to see when you switch to 2D mapping, but I had a few buttons to spare, so I thought why not. - L and R Buttons
Decreases or increase the starting tile, respectively. Again, I had a few keys to spare.
// Excerpt from toolbox.h

void oam_init(OBJ_ATTR *obj, uint count);
void oam_copy(OBJ_ATTR *dst, const OBJ_ATTR *src, uint count);

INLINE OBJ_ATTR *obj_set_attr(OBJ_ATTR *obj, u16 a0, u16 a1, u16 a2);
INLINE void obj_set_pos(OBJ_ATTR *obj, int x, int y);
INLINE void obj_hide(OBJ_ATTR *oatr);
INLINE void obj_unhide(OBJ_ATTR *obj, u16 mode);

// === INLINES ========================================================

//! Set the attributes of an object.
INLINE OBJ_ATTR *obj_set_attr(OBJ_ATTR *obj, u16 a0, u16 a1, u16 a2)
{
    obj->attr0= a0; obj->attr1= a1; obj->attr2= a2;
    return obj;
}

//! Set the position of \a obj
INLINE void obj_set_pos(OBJ_ATTR *obj, int x, int y)
{
    BF_SET(obj->attr0, y, ATTR0_Y);
    BF_SET(obj->attr1, x, ATTR1_X);
}

//! Hide an object.
INLINE void obj_hide(OBJ_ATTR *obj)
{   BF_SET2(obj->attr0, ATTR0_HIDE, ATTR0_MODE);        }

//! Unhide an object.
INLINE void obj_unhide(OBJ_ATTR *obj, u16 mode)
{   BF_SET2(obj->attr0, mode, ATTR0_MODE);          }
// toolbox.c

void oam_init(OBJ_ATTR *obj, uint count)
{
    u32 nn= count;
    u32 *dst= (u32*)obj;

    // Hide each object
    while(nn--)
    {
        *dst++= ATTR0_HIDE;
        *dst++= 0;
    }
    // init oam
    oam_copy(oam_mem, obj, count);
}

void oam_copy(OBJ_ATTR *dst, const OBJ_ATTR *src, uint count)
{

// NOTE: while struct-copying is the Right Thing to do here,
//   there's a strange bug in DKP that sometimes makes it not work
//   If you see problems, just use the word-copy version.
#if 1
    while(count--)
        *dst++ = *src++;
#else
    u32 *dstw= (u32*)dst, *srcw= (u32*)src;
    while(count--)
    {
        *dstw++ = *srcw++;
        *dstw++ = *srcw++;
    }
#endif

}
This is the basic utility code for the demo, and contains most of the things you’d actually like to have functions for. Note that the inline functions make good use of the bitfield macros shown earlier; if I hadn’t done that, the code would be a good deal longer.
Another point that I need to make is that if I’d put everything into toolbox.h, the file would be pretty big, around 700 lines or so. And with future demos, it’d be a lot longer. With that in mind, I’ve started redistributing the contents a little: all the types go in types.h, everything to do with the memory map goes into memmap.h, all the register defines go into memdef.h and the input inlines and macros can be found in input.h. The rest is still in toolbox.h, but will find themselves redistributed in the end as well.
The two functions in toolbox.c need some more clarification as well I guess. In oam_init() I cast the objects to a word pointer and use that for setting things; again, this is simply because it’s a lot faster. Because it may be used to initialixe something other than the real OAM, I copy the initialized buffer to OAM just in case.
The other point concerns something of a very specific bug in the optimizer of the current compiler (devkitARM r19b). I expect this to be fixed in a later addition and the basic version here should work, but just in case it isn’t, set the #if expression to 0 if you see OAM get corrupted. If you must know, the problem seems to be struct copying of OBJ_ATTRs in a for loop. Yes, it’s that specific. Even though struct copying is legal and fast if they’re word aligned, it seems GCC gets confused with 8-byte blocks in loops and uses memcpy() for each struct anyway, something that wouldn’t work on OAM. Oh well.
#include <string.h>
#include "toolbox.h"
#include "metr.h"


OBJ_ATTR obj_buffer[128];
OBJ_AFFINE *obj_aff_buffer= (OBJ_AFFINE*)obj_buffer;

void obj_test()
{
    int x= 96, y= 32;
    u32 tid= 0, pb= 0;      // (3) tile id, pal-bank
    OBJ_ATTR *metr= &obj_buffer[0];

    obj_set_attr(metr,
        ATTR0_SQUARE,              // Square, regular sprite
        ATTR1_SIZE_64,              // 64x64p,
        ATTR2_PALBANK(pb) | tid);   // palbank 0, tile 0

    // (4) position sprite (redundant here; the _real_ position
    // is set further down
    obj_set_pos(metr, x, y);

    while(1)
    {
        vid_vsync();
        key_poll();

        // (5) Do various interesting things
        // move left/right
        x += 2*key_tri_horz();
        // move up/down
        y += 2*key_tri_vert();

        // increment/decrement starting tile with R/L
        tid += bit_tribool(key_hit(-1), KI_R, KI_L);

        // flip
        if(key_hit(KEY_A))  // horizontally
            metr->attr1 ^= ATTR1_HFLIP;
        if(key_hit(KEY_B))  // vertically
            metr->attr1 ^= ATTR1_VFLIP;

        // make it glow (via palette swapping)
        pb= key_is_down(KEY_SELECT) ? 1 : 0;

        // toggle mapping mode
        if(key_hit(KEY_START))
            REG_DISPCNT ^= DCNT_OBJ_1D;

        // Hey look, it's one of them build macros!
        metr->attr2= ATTR2_BUILD(tid, pb, 0);
        obj_set_pos(metr, x, y);

        oam_copy(oam_mem, obj_buffer, 1);   // (6) Update OAM (only one now)
    }
}

int main()
{
    // (1) Places the tiles of a 4bpp boxed metroid sprite
    //   into LOW obj memory (cbb == 4)
    memcpy(&tile_mem[4][0], metr_boxTiles, metr_boxTilesLen);
    memcpy(pal_obj_mem, metrPal, metrPalLen);

    // (2) Initialize all sprites
    oam_init(obj_buffer, 128);
    REG_DISPCNT= DCNT_OBJ | DCNT_OBJ_1D;

    obj_test();

    while(1);

    return 0;
}
Setting up sprites
Before any sprites show up, there are three things you have to do, although not necessarily in this order. They are: copying sprite graphics to VRAM, setting up OAM to use these graphics, and enabling sprites in the display control, REG_DISPCNT.
Display control
Starting with the last one, you enable sprites by setting bit 12 of REG_DISPCNT. Usually you’ll also want to use 1D mapping, so set bit 6 as well. This is done at point (2) of the code.
Hiding all sprites
The other step performed here is a call to oam_init(). This isn’t strictly necessary, but a good idea nonetheless. What oam_init() does is hide all the sprites. Why is this a good idea? Well, because a fully zeroed out OAM does not mean the sprites are invisible. If you check the attributes you’ll see that this will mean that they’re all 8×8-pixel sprites, using tile 0 for their graphics, located at (0,0). If the first tile isn’t empty, you’ll start with 128 versions of that tile in the top-left corner, which looks rather strange. So, make sure they’re all invisible first. The demo also comes with obj_hide() and obj_unhide() functions, although they aren’t used here.
Loading sprite graphics
The first thing to do (point (1)) is to store the sprite graphics in object VRAM. As I’ve already said a few times now, these graphics should be stored as 8×8-pixel tiles, not as a flat bitmap. For example, my sprite here is 64×64p in size, so to store it I’ve had to convert this to 8×8 separate tiles first. If you do not do this, your sprites will look very strange indeed.
Exactly where you put these tiles is actually not all that relevant (apart from the obvious, like mapping mode, and tile alignment, of course). Object VRAM works as a texture pool and has nothing to do with the screen directly. You store the tiles that you want to be available there, and it is by manipulating the OAM attributes that the system knows which tiles you want to use and where you want them. There is no reason why sprite 0 couldn’t start at tile 42, or why multiple sprites couldn’t use the same tiles. This is also why OAMData, which is sometimes used for object VRAM, is such a misnomer: object VRAM has nothing to do with OAM. Nothing! If your headers use this name for 0601:0000, or even 0601:4000, change it. Please. And be careful where you put things in the bitmap modes, as you can’t use tiles 0-511 there.
As I said, loading the sprites happens at point (1) in the code. If you paid attention to the overview, you’ll remember that tile_mem[][] is a two dimensional array, mapping charblocks and 4-bit tiles. You’ll also remember that object VRAM is charblocks 4 and 5, so &tile_mem[4][0] points to the first tile in object VRAM. So I’m loading my boxed metroid into the first 64 tiles of object VRAM.
I am also loading its palette into the sprite palette. That’s sprite palette (0500:0200), not background palette. Load it to the wrong place and you won’t see anything.
Finding tile addresses
Use tile_mem or a macro to find the addresses to copy your tiles too, it’s much more readable and maintainable than calculating them manually. You should not have any hard-coded VRAM addresses in your code, ever.
OAMData
Headers from other sites sometimes #define OAMData as part of VRAM. It is not. Rename it.
Setting attributes
Lastly, I’ll set up one OBJ_ATTR so that it actually uses the metroid tiles. This is done at point (3), using the obj_set_attr() inline function. All it does is three assignments to the attributes of the first argument, by the way, nothing spectacular. This just saves typing doing it this way rather than three separate statements. With this particular call, I tell this sprite that it’s a 64×64 pixel (8×8 tile) sprite, and its starting tile is tid, which is 0. This means that it’ll use the 64 tiles, starting at tile 0.
Note that the sprite I’m setting is actually part of the OAM buffer, not the real OAM. This means that even after I set the attributes there, nothing happens yet. To finalize the sprite I need to update the real OAM, which is done by a call to oam_copy() (point (6)). This carries two arguments: an index and a count denoting how many sprites to update, and which sprite to start at. I also have obj_copy(), which only copies attributes 0, 1 and 2, but not 3! This is necessary when you start using affine sprites, which may be copied incorrectly otherwise.
The previous steps are enough to get the metroid sprite on-screen. The story doesn’t end there, of course. Here are a few things that you can do with sprites.
Sprite positioning
The first order of business is usually to place it at some position on screen, or even off screen. To do this you have to update the bits for the y and x positions in attributes 0 and 1, respectively. One mistake I often seem to make is fill x into attr0 and y into attr1, when it should be the other way around. If your sprite moves strangely, this might be why.
Note that these coordinates mark the top-left of the sprite. Also, the number of bits for the coordinates means we have 512 possible x-values and 256 y-values. The coordinate ranges wrap around, so you could also say that these are signed integers, with the ranges x ∈ [-256, 255] and y ∈ [-128, 127]. Yes, that would make the highest y-value smaller than the height of the screen, but thanks to the wrapping it all works out. Well, almost. Anyway, thanks to the 2s-complement nature of integers, simply masking the x and y values by 0x01FF and 0x00FF, respectively, will give proper 9- and 8-bit signed values. You can do this manually, or use the obj_set_pos() function used at point (4).
You might see code that clears the lower bits of the attributes and then directly ORRs in x and y. This is not a good idea, because negative values are actually represented by upper half of a datatype’s range. −1 for example is all bits set (0xFFFFFFFF). Without masking off the higher bits, negative values would overwrite the rest of the attribute bits, which would be bad.
Mask your coordinates
If you’re making a sprite positioning function or use someone else’s make sure you mask off the bits in x and y before you insert them into the attributes. If not, negative values will overwrite the whole attribute.
This is bad
obj->attr0= (obj->attr0 &~ 0x00FF) | (y);
This is good:
obj->attr0= (obj->attr0 &~ 0x00FF) | (y & 0x00FF);
Position variables and using tribools
Instead of using an OBJ_ATTR to store the sprite’s position, it is better to keep them in separate variables, in this case x and y. This avoids having to mask coordinate fields all the time, but more importantly, the positions can extend beyond the size of the screen. As most game worlds aren’t restricted to a single screen, this is an important point. Then, when the time is right, these are fed to oam_set_pos() to update the sprite.
Also, note the use of my tribool key functions to update the positions. Input processing often follows a pattern of “key X pressed: increment, key opposite of Y pressed, decrement” The tribool functions bring that kind of code down from four lines to one, which makes the code easier to read (once you get over the initial hurdle). For example, key_tri_horz() returns +1 if ‘right’ is pressed, −1 if ‘left’ is pressed, and 0 if neither or both are pressed. key_tri_vert() does something similar for vertical movement and the line with bit_tribool() function makes a variant using key_hit() and R and L to increment or decrement the tile index.
Other attrs
Sprite coordinates are only two of the many sprite attributes that can be controlled with via specific OAM bits, even while the sprite is already active. Some of the obvious ones are flipping or mirroring it, which can be done using A and B here. Or, if you’re using a 4bpp sprite, you can swap palettes so that all the colors change. Pressing Select in the demo switches from palette bank 0 to 1, which happens to have a grey to white gradient. Toggling between these palette banks quickly can make the sprite flash. You could also change the priorities in which the sprites are rendered, or toggle alpha blending, although I haven’t done those things here.
Now, these things don’t really change the overall image of the sprite. What you should realize though is that it is possible to do that. As I’ve already noted before, it’s not true that the contents of VRAM are the sprite, rather that a sprite uses parts of VRAM to show something, anything, on screen. You could, for example, change the starting tile tid that the sprite uses, which in this case can be done using L and R. Not only is this legal, it’s the standard practice for animation (although you can also overwrite VRAM for that – resetting the tile index is just faster). Understanding this is one of the points of moving from a user to a developer perspective: the user only sees the surface; the coder looks below it and sees what’s really going on.
And that’s it for regular sprites. Using multiple sprites isn’t much different – seen one, seen them all. Basic animation shouldn’t be problematic either, until you run out of VRAM to put them in. There are still a few regions left untouched like blending and mosaic, but I’ll deal with those later.